Introduction to ASP.NET MVC:
ASP.NET MVC is a new web application framework
from Microsoft. MVC stands for Model-View-Controller, a pattern that’s becoming
increasingly popular with web development frameworks. ASP.NET MVC is an
alternative and a complement to Web Forms, which means you won’t be dealing
with pages and controls, postbacks or view state, or complicated ASP.NET event
life cycle.
1. Model
2. View
3. Controller
ASP.NET MVC Web Application
Advantages
1. Separation of concern
2. TDD
3. Extensible and pluggable
4. Full control over application behavior
5. ASP.NET features are supported
6. URL routing mechanism
The ASP.NET MVC simplifies the complex parts
of ASP.net Web Forms without any compromise of the power and flexibility of
ASP.NET platform. ASP.net MVC implements Model-View-Controller UI pattern for
web application development that lets you allows to develop applications in a
loosely couples manner. MVC pattern is separating the application in three
parts- Model, View and Controller.
Difference between Asp.Net MVC
and Web Forms
Asp.Net Web Forms
|
Asp.Net MVC
|
Asp.Net Web Form follows a
traditional event driven development model.
|
Asp.Net MVC is a
lightweight and follow MVC (Model, View, and Controller) pattern based
development model.
|
Asp.Net Web Form has
server controls.
|
Asp.Net MVC has html
helpers.
|
Asp.Net Web Form supports
view state for state management at client side.
|
Asp.Net MVC does not
support view state.
|
Asp.Net Web Form has
file-based URLs means file name exist in the URLs must have its physically
existence.
|
Asp.Net MVC has
route-based URLs means URLs are divided into controllers and actions and
moreover it is based on controller not on physical file.
|
Asp.Net Web Form follows
Web Forms Syntax
|
Asp.Net MVC follow
customizable syntax (Razor as default)
|
In Asp.Net Web Form, Web
Forms (ASPX) i.e. views are tightly coupled to Code behind (ASPX.CS) i.e.
logic.
|
In Asp.Net MVC, Views and
logic are kept separately.
|
Asp.Net Web Form has
Master Pages for consistent look and feels.
|
Asp.Net MVC has Layouts
for consistent look and feels.
|
Asp.Net Web Form has User
Controls for code re-usability.
|
Asp.Net MVC has Partial
Views for code re-usability.
|
Asp.Net Web Form has
built-in data controls and best for rapid development with powerful data
access.
|
Asp.Net MVC is
lightweight, provide full control over markup and support many features that
allow fast & agile development. Hence it is best for developing
interactive web application with latest web standards.
|
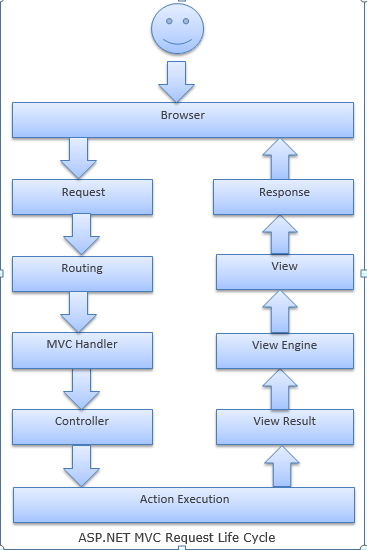
Asp.net MVC Request Life Cycle
While programming with Asp.net MVC, you should be aware of
the life of an Asp.net MVC request from birth to death. In this article, I am
going to expose the Asp.net MVC Request Life cycle. There are seven main steps
that happen when you make a request to Asp.net MVC web applications.
Routing in
Asp.Net MVC
Basically, Routing is
a pattern matching system that monitors the incoming request and figure out
what to do with that request. At runtime, Routing engine use the Route table
for matching the incoming request's URL pattern against the URL patterns
defined in the Route table. You can register one or more URL patterns to the
Route table at Application_Start event. MVC5 also supports attribute routing
Define Route :
1.
public
static void RegisterRoutes(RouteCollection routes)

Matching URLs
1.
public
static void RegisterRoutes(RouteCollection routes)
2.
{
3.
routes.MapRoute(
4.
"Default", // Route name
5.
"{controller}/{action}/{id}", // Route Pattern
6.
new{controller="Home",action="Index",id=UrlParameter.Optional}
7.
//
Default values for above defined parameters
8.
);
9.
}
10.
11.protected void Application_Start()
12.{
13. RegisterRoutes(RouteTable.Routes);
14. //To:DO
15.}
Request URL
|
Parameters
|
http://example.com/
|
controller=Home,
action=Index, id=none, Since default value of controller and action are Home
and Index respectively.
|
http://example.com/Product
|
controller=Product,
action=Index, id=none, Since default value of action is Index
|
http://example.com/Product/Price
|
controller=Product,
action=Price, id=none
|
http://example.com/Product/Price/1234567
|
controller= Product,
action=Price, id=1234567
|
http://example.com/Product/Price/Discount/1
|
No Match Found
|
Return View()
vs Return RedirectToAction() vs Return Redirect() vs Return RedirectToRoute()
Return View()
This tells MVC to generate
HTML to be displayed for the specified view and sends it to the browser. This
acts like as Server.Transfer() in Asp.Net WebForm.
Return RedirectToAction()
This tells MVC to redirect
to specified action instead of rendering HTML. In this case, browser receives
the redirect notification and makes a new request for the specified action.
This acts like as Response.Redirect() in Asp.Net WebForm.
Return Redirect()
This tells MVC to redirect
to specified URL instead of rendering HTML. In this case, browser receives the
redirect notification and makes a new request for the specified URL. This also
acts like as Response.Redirect() in Asp.Net WebForm. In this case, you have to
specify the full URL to redirect.
Return RedirectToRoute()
This tells MVC to look up
the specifies route into the Route table that is defined in global.asax and
then redirect to that controller/action defined in that route. This also make a
new request like RedirectToAction().
Defined Route
1. public static void RegisterRoutes(RouteCollection routes)
2. {
3. routes.MapRoute(
4. "MyRoute", // Route name
5. "Account/", // URL
6. new{controller="Account",action="Login"} // Parameter defaults
7. );
8.
9. routes.MapRoute(
10. "Default", // Route name
11. "{controller}/{action}/{id}", // URL with parameters
12. new{controller="Home",action="MyIndex",id=UrlParameter.Optional} // Parameter defaults
13. );
14.}
Note:1. Return View doesn't make a new requests, it just renders
the view without changing URLs in the browser's address bar.
2. Return RedirectToAction makes a new requests and URL in
the browser's address bar is updated with the generated URL by MVC.
3. Return Redirect also makes a new request and URL in the
browser's address bar is updated, but you have to specify the full URL to
redirect
4. Between RedirectToAction and Redirect, best practice is
to use RedirectToAction for anything dealing with your application
actions/controllers. If you use Redirect and provide the URL, you'll need to
modify those URLs manually when you change the route table.
5. RedirectToRoute redirects to a specific route defined in
the Route table.
What’s HTML
Helpers in ASP.NET MVC?
HTML Helper is just a method that
returns a HTML string. The string can represent any type of content that you
want. For example, you can use HTML Helpers to render standard HTML tags like
HTML <input>, <button> and <img> tags etc.
Different
types of HTML Helpers
There are three types of
HTML helpers as given below:
· Inline Html Helpers
These are creating in the same view by using the Razor @helper
tag. These helpers can be reused only on the same view.
1. @helper ListingItems(string[] items)
2. {
3. <ol>
4. @foreach (string item in items)
5. {
6. <li>@item</li>
7. }
8. </ol>
9. }
10.
11.<h3>Programming Languages:</h3>
12.
13.@ListingItems(new string[] { "C", "C++", "C#" })
14.
15.<h3>Book List:</h3>
16.
17.@ListingItems(new string[] { "How to C", "how to C++", "how to C#" })
· Built-In Html Helpers
Built-In Html Helpers are extension methods on the HtmlHelper
class. The Built-In Html helpers can be divided into three categories-
1) Standard Html Helpers
These helpers are used to render the most common types of HTML
elements like as HTML text boxes, checkboxes etc. For example for TextBox
@Html.TextBox("Textbox1",
"val")
Output: <input id="Textbox1"
name="Textbox1" type="text" value="val" />
Output: <input id="Textbox1" name="Textbox1" type="text" value="val" />
2) Strongly Typed HTML Helpers
These helpers are used to render the most common types of HTML
elements in strongly typed view like as HTML text boxes, checkboxes etc. The
HTML elements are created based on model properties.
@Html.TextBoxFor(m=>m.Name)
Output: <input id="Name"
name="Name" type="text" value="Name-val" />
Output: <input id="Name" name="Name" type="text" value="Name-val" />
3) Templated HTML Helpers
These helpers figure out what HTML elements are required to
render based on properties of your model class. This is a very flexible
approach for displaying data to the user, although it requires some initial care
and attention to set up. To setup proper HTML element with Templated HTML
Helper, make use of DataType attribute of DataAnnitation class.
Html.EditorFor(m => m. Name)
Html.EditorFor(m => m. Name)
·
Custom Html Helpers
You can also create your own
custom helper methods by creating an extension method on the HtmlHelper class
or by creating static methods with in a utility class.
1. public static class CustomHelpers
2. {
3. //Submit Button Helper
4. public static MvcHtmlString SubmitButton(this HtmlHelper
5. helper, string buttonText)
6. {
7. string str = "<input type=\"submit\" value=\"" +
8. buttonText + "\" />";
9. return new MvcHtmlString(str);
10. }
11.
12. //Readonly Strongly-Typed TextBox Helper
13. public static MvcHtmlString TextBoxFor<TModel, TValue>(this
14. HtmlHelper<TModel> htmlHelper, Expression<Func<TModel, TValue>>
15. expression, bool isReadonly)
16. {
17. MvcHtmlString html = default(MvcHtmlString);
18.
19. if (isReadonly)
20. {
21. html = System.Web.Mvc.Html.InputExtensions.TextBoxFor(htmlHelper,
22. expression, new { @class = "readOnly",@readonly = "read-only" });
23. }
24. else
25. {
26.
27. html=System.Web.Mvc.Html.InputExtensions.TextBoxFor(htmlHelper,
28. expression);
29. }
30.
31. return html;
32. }
33. }
Layouts,
RenderBody, RenderSection and RenderPage in ASP.NET MVC
Layouts
are used to maintain a consistent look and feel across multiple views within
ASP.NET MVC application. As compared to Web Forms, layouts serve the same
purpose as master pages, but offer a simple syntax and greater flexibility.
Basic structure of Layout Page
1. <!DOCTYPE html>
2. <html>
3. <head>
4. <meta charset="utf-8" />
5. <meta name="viewport" content="width=device-width" />
6. <title>@ViewBag.Title</title>
7. @Styles.Render("~/Content/css")
8. @Scripts.Render("~/bundles/modernizr")
9. </head>
10.<body>
11. @RenderBody()
12. @Scripts.Render("~/bundles/jquery")
13. @RenderSection("scripts", required: false)
14. </body>
15.</html>
In Asp.Net MVC, at
application level we have _ViewStart file with in Views folder for defining the
default Layout page for your ASP.NET MVC application.
1. <!DOCTYPE html>
2. <html>
3. <head>
4. <meta charset="utf-8" />
5. <meta name="viewport" content="width=device-width" />
6. <title>@ViewBag.Title</title>
7. @Styles.Render("~/Content/css")
8. @Scripts.Render("~/bundles/modernizr")
9. </head>
10.<body>
11. @RenderBody()
12. @Scripts.Render("~/bundles/jquery")
13. @RenderSection("scripts", required: false)
14. </body>
15.</html>
Styles.Render
and Scripts.Render
Style.Render is used to
render a bundle of CSS files defined within BundleConfig.cs files.
Styles.Render create style tag(s) for the CSS bundle. Like Style.Render,
Scripts.Render is also used to render a bundle of Script files by rendering
script tag(s) for the Script bundle.1. public class BundleConfig
2. {
3. public static void RegisterBundles(BundleCollection bundles)
4. {
5. bundles.Add(new ScriptBundle("~/bundles/jqueryval").Include(
6. "~/Scripts/jquery.unobtrusive*",
7. "~/Scripts/jquery.validate*"));
8.
9. bundles.Add(new StyleBundle("~/Content/themes/base/css").Include(
10. "~/Content/themes/base/jquery.ui.core.css",
11. "~/Content/themes/base/jquery.ui.resizable.css",
12. "~/Content/themes/base/jquery.ui.selectable.css",
13. "~/Content/themes/base/jquery.ui.button.css",
14. "~/Content/themes/base/jquery.ui.dialog.css",
15. "~/Content/themes/base/jquery.ui.theme.css"));
16. }
17.}
Note:
You can enable and disable
optimizations by setting EnableOptimizations property of BundleTable class to
true or false with in Global.asax.cs file as shown below.1. protected void Application_Start() {
2. //Other code has been removed for clarity
3. System.Web.Optimization.BundleTable.EnableOptimizations = false;
4. }
1. public class BundleConfig
2. {
3. public static void RegisterBundles(BundleCollection bundles)
4. {
5. bundles.Add(new ScriptBundle("~/bundles/jqueryval").Include(
6. "~/Scripts/jquery.unobtrusive*",
7. "~/Scripts/jquery.validate*"));
8.
9. bundles.Add(new StyleBundle("~/Content/themes/base/css").Include(
10. "~/Content/themes/base/jquery.ui.core.css",
11. "~/Content/themes/base/jquery.ui.resizable.css",
12. "~/Content/themes/base/jquery.ui.selectable.css",
13. "~/Content/themes/base/jquery.ui.button.css",
14. "~/Content/themes/base/jquery.ui.dialog.css",
15. "~/Content/themes/base/jquery.ui.theme.css"));
16. }
17.}
1. protected void Application_Start() {
2. //Other code has been removed for clarity
3. System.Web.Optimization.BundleTable.EnableOptimizations = false;
4. }
Sections
A section allows you to
specify a region of content within a layout. It expects one parameter which is
the name of the section. If you don’t provide that, an exception will be
thrown. A section in a layout page can be defined by using the following code.1. @section header{
2. <h1>Header Content</h1>
3. }
You can render above defined
section header on the content page as given below:1. @RenderSection("header")
By default, sections are
mandatory. To make sections optional, just provides the second parameter value
as false, which is a Boolean value.1. @RenderSection("header",false)
1. @section header{
2. <h1>Header Content</h1>
3. }
1. @RenderSection("header")
1. @RenderSection("header",false)
Note:
A view can define only those sections that are referred to
in the layout page otherwise an exception will be thrown.
RenderBody
RenderBody method exists in
the Layout page to render child page/view. It is just like the
ContentPlaceHolder in master page. A layout page can have only one RenderBody
method.1. @RenderBody()
1. @RenderBody()
RenderPage
RenderPage method also
exists in the Layout page to render other page exists in your application. A
layout page can have multiple RenderPage method.1. @RenderPage("~/Views/Shared/_Header.cshtml")
Helper
Methods
Asp.net MVC has the following Built-in
ActionResults Type and Helper methods:
1.
ViewResult
MVC
Data Annotations for Model Validation
Data validation is a key aspect for developing
web application. In Asp.net MVC, we can easily apply validation to web
application by using Data Annotation attribute classes to model class. Data
Annotation attribute classes are present in System.ComponentModel.DataAnnotations
namespace and are available to Asp.net projects like Asp.net web application
& website, Asp.net MVC, Web forms and also to Entity framework form models.
Designing the model
with Data Annotations
Some
Tips for using ViewModel
ViewData
vs ViewBag vs TempData vs Session
ASP.NET MVC there are three ways - ViewData, ViewBag and TempData to
pass data from controller to view and in next request. Like WebForm, you can
also use Session to persist data during a user session. Now question is that
when to use ViewData, VieBag, TempData and Session. Each of them has its own
importance.
1. @RenderPage("~/Views/Shared/_Header.cshtml")
1. using System.ComponentModel;
2.
using System.ComponentModel.DataAnnotations;
3.
using System.Web.Mvc;
4.
namespace Employee.Models
5.
{
6.
[Bind(Exclude = "EmpId")]
7.
public class Employee
8.
{
9.
[ScaffoldColumn(false)]
10. public int EmpId { get; set; }
11.
12. [DisplayName("Employee
Name")]
13. [Required(ErrorMessage = "Employee Name is required")]
14. [StringLength(100,MinimumLength=3)]
15. public String EmpName { get; set; }
16.
17. }
18.}
1.
<script src="@Url.Content("~/Scripts/jquery.validate.min.js")" type="text/javascript"></script>
2.
<script src="@Url.Content("~/Scripts/jquery.validate.unobtrusive.min.js")" type="text/javascript"></script>
1.
@model Employee.Models
2.
@{
3.
ViewBag.Title = "Employee Details";
4.
Layout = "~/Views/Shared/_Layout.cshtml";
5.
}
6.
@using (Html.BeginForm())
7.
{
8.
<div class="editor-label">
9. @Html.LabelFor(m => m.EmpName)
10. </div>
11. <div class="editor-field">
12. @Html.TextBoxFor(m => m.EmpName)
13. @Html.ValidationMessageFor(m
=> m.EmpName)
14. </div>
15. <p> <input
type="submit" value="Save" />
16. </p>
17.}
1.
public ViewDataDictionary ViewData { get; set; }
1.
public Object ViewBag { get; }
TempData1. public TempDataDictionary TempData { get; set; }
2. TempData
is a property of ControllerBase class.
Session1. public HttpSessionState Session { get; }
2. Session
is a property of HttpContext class.
1. public TempDataDictionary TempData { get; set; }
1. public HttpSessionState Session { get; }
No comments:
Post a Comment